 Getting Started with Lineage Manager™ for Dogs v1.33
Lineage Manager™ for Dogs has a new website!
Please visit our new site at
LineageManager.com today!
Overview
Lineage Manager for Dogs (LMD) is a database program designed specifically for dog owners and breeders. A database is a place to store information about your dogs and their ancestors. The Lineage Manager for Dogs database stores data for each dog as it is entered. A database index file (files with a x in the file extension) provides an index into the database facilitating the high speed searching that occurs as you use the program.
Step 1: Creating your first LMD Database
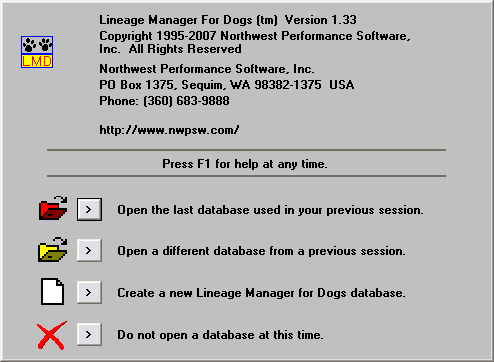
When you start LMD, you are immediately presented with a dialog box containing four choices.
The default choice is to use the last database previously open. However, since this is the
first time you must choose the option that creates a new LMD database. Press the button labeled
"Create a new Lineage Manager for Dogs database".
Step 2: Naming your first LMD Database
At this point, you will be asked to name your new database.
Enter a name for your database here. Since this program is a
16 bit program that runs on both 16 and 32 bit versions of
Microsoft Windows, the name of the database cannot exceed 8
characters. You may also select the directory that the
database will be stored in at this time.
Step 3: Database Manager
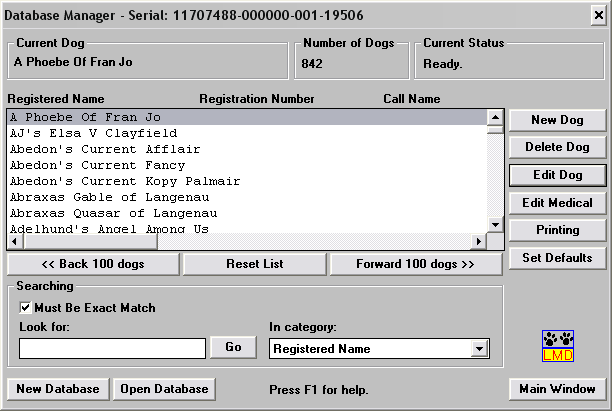
After creating a new database or opening another database,
you are presented with a dialog box called Database Manager.
Database Manager is the focal point for most of your work.
(Note: to close the Database Manager dialog, press the
button labeled Main Window.) After entering information
about a dog, you are always returned to Database Manager. If
you activate a print or print preview from the Database
Manager, you are returned to Database Manager to continue
your work.
Database Manager displays several things:
Database Manager displays several things:
- The current dog.
- The number of dogs in the database.
- The current status.
- A list of dogs in the database.
- A database search tool.
- New Dog. Allows you to create and add a new dog to the database.
- Delete Dog. Deletes a dog from the database.
- Edit Dog. Edits a dog currently in the database. Note: You can also edit a dog by double-clicking on any dog in the list of dogs.
- Edit Medical. Closes Database Manager and takes you to the Medical Database Manager.
- Printing. Activates the Select Report to Print dialog.
- Set Defaults. Allows you to enter a set of default values or commonly entered things like breed.
- Back 100 dogs.
- Forward 100 dogs.
- Reset List. Resets the list back to the first dog in alphabetical order by registered name.
- New Database. Creates a new database as described in step 1 above.
- Open Database. Opens a different database than the one that is currently open.
- Main Window. Closes the Database Manager window and allows access to the main application window.
Step 4: Entering Your Dogs--General Dog Information
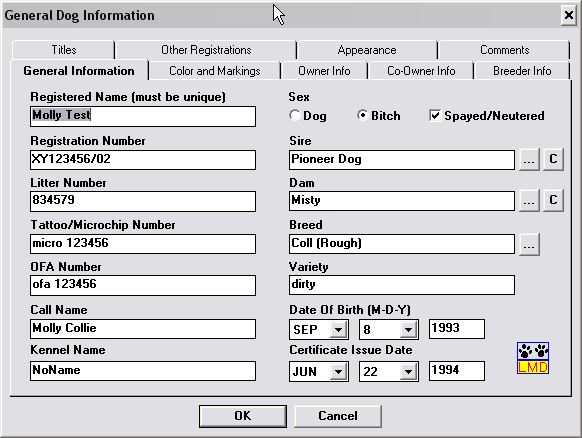
To enter a dog press the New Dog button in
Database Manager. This will activate a tabbed dialog box
called General Dog Information. You are required
to enter the registered name for the dog in the registered
name edit box. You are not required to enter any other
information, although filling out the information (such as
selecting the sex of the dog) on each tab or page of the
dialog box is recommended.
Notes:
Notes:
- Each entry box has its own limits for the number of characters you can enter.
- You cannot enter the Sire or the Dam by typing in the edit boxes. You must create the parent dogs and link them by pressing the [...] button next to sire or dam.
- Do not enter the dogs titles with the registered name. Titles are to be entered on the titles tab. You may create or delete as many titles as you wish. Each dog has a limited number of titles that it may use.
- When creating a new title, don't forget to check the Title appears before dogs name box if you want the title to appear before the dogs name on the printouts.
- When you enter text into a single line edit box, do not hit the enter key. If you hit the enter key, it will have the same effect as using the mouse to click on OK. You may hit the enter key on multi-line edit boxes like the comments section without dismissing the dialog box.
Step 5: Linking a Dog to its Sire and Dam
Once you have two or more dogs entered in the database
linking the sire and dam to any dog is simple. The following
steps assume that you have two or more dogs in the database
with the sex of the dog correctly selected.
Notes:
Notes:
- Select a descendant dog from the list of available dogs in Database Manager.
- Click on Edit Dog or double-click on the dogs name.
- Click on the ellipses [...] button to the right of the Sire edit box. All the male dogs in the database will appear in a list.
- Select the sire from the list and press OK.
- Repeat the same procedure for the Dam.
Step 6: Printing a Pedigree
At this point, we shall assume you have entered several dogs
and the dogs have been linked with their respective sire and
dam.
From Database Manager, press the Printing button. Or from the Medical Database Manager press the Printing button. You will be presented with a dialog box labeled Select Report to Print.
From Database Manager, press the Printing button. Or from the Medical Database Manager press the Printing button. You will be presented with a dialog box labeled Select Report to Print.
- Select the type of report you want by single clicking on it.
- To preview the report press Print Preview.
- To print the report immediately press Print.
Step 7: Exiting Lineage Manager for Dogs
Exiting requires access to the main program window menubar.
- From Database Manager press the Main Window button.
- From Medical Database Manager, press the Return to Database Manager button. Then from Database Manager press the Main Window button.
- Select the menu item File, then Exit.